Using a Digital Camera to Copy
Our friend Ann and I spent the day recently trying out a technique she had discovered that allows you to use your digital camera to copy things that are not scannable for some reason. Ann is my more-or-less local photography expert. I had been talking with her about some old family things I wanted to digitize but couldn’t put on my scanner. For example, I have a number of daguerreotypes and/or ambrotypes (which I still have trouble telling apart), some photo albums that don’t open flat, and some large photocopies of a family ledger with information that take up 2 pages for each ledger page that I would like to scan but it won’t fit.
Ann had discovered this site that describes a very simple way to set up a tripod and camera to take pictures of such things. For those of us who don’t have, or have easy access to, a professional copy stand, this is the way to go.
We finally managed to schedule a day to get together. I drove out to her house with my bags of photo albums and the ledger pages. I had decided strategically not to try to take the daguerreotypes for this first attempt because I know they will require some special handling and they are the most fragile items. Ann was the designated photographer and I assigned myself the helper role, and also the photo-journalist of the proceedings.
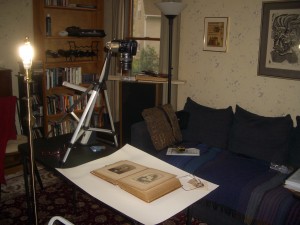
Although the model we were following reasonably suggests setting up a location in your home office or other space that can be modified, we thought that if you can use this technique in an archives or library we could do it in a temporary setting at Ann’s. This is a picture of our set up in her living room.

You will notice that we used a folding table and two lamps (one desk lap and one floor lamp) to provide the extra lighting. You may also notice that this leaves the camera eyepiece out of easy reach. We used a little step-stool for Ann to be able to use the eyepiece and make any focus adjustments necessary. We were trying to be careful about focus and any glare on the image so she needed to be up there for each shot. This is a very make-shift way to do it, and if I were planning to do very much copying this way I would certainly figure out a more permanent location and furniture etc. to use. On the other hand, what we learned is that once you have the idea how to put it all together, it should be very possible to use the set-up anyplace that has a table or desk you can attach the tripod to.
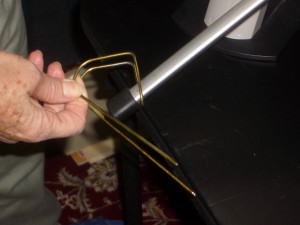
The most tricky part of our getting set up was figuring out exactly how to make and use the clip fashioned from a metal coat-hanger. This is actually the genius of the whole set-up. We hadn’t closely read the original description and were trying to use a whole hanger, bending it this way and that. Didn’t work. Obviously you want the tripod to be stable, both for the quality of the pictures and for the safety of the camera. When we finally read the description of the clip, and looked very closely at the one picture provided we figured it out. Only took an hour or so! This is a picture of the clip attached to the tripod leg. The long straight legs fit under the table and helped stabilize the tripod.

Once we got everything set up it proved to be pretty fast and efficient to take a picture, flip to the next one, take another. In a couple of hours or less, Ann took more than a hundred pictures and we transferred mine to a thumbdrive. (We netted 142 images, Ann says.) Since we also had time for lunch and a nice walk around a local lake, and I was only there for the afternoon, you can see that it was efficient.
A couple of suggestions I would make about using this system: although the original author says you don’t have to look in your camera or use a remote shutter, this will only work if all of what you are copying is the same size and distance from the lens. Of course if you have a pile of similar items, it will be much faster to set up and not have to check focus and distance each time. I also think that the remote shutter is a good idea to remove one way to jar the camera and move it out of position. On the other hand, we were using Ann’s camera which is a digital SLR, not my little point and shoot, so it was heavier and had more settings. The last suggestion is about format for saving your images. Ann was able to set her camera to shoot in RAW format, which doesn’t compress the image as it is saved. Most digital cameras that are point and shoot won’t give you this option but will only save the images in JPG format. If you have to take the pictures in JPG be sure to convert them to a non-compressed format when you have saved them on your computer.

Good luck, Nancy! Let me know if you have questions about it. I couldn’t believe how long it took 2 of us to figure out what the clip was supposed to look like.
This was a very helpful post. I’ve been photographing some photographs in a much more makeshift way than this and with less success that you’ve had. I’ll have to see if I can manage a set-up like yours. Thanks.
I know I’m not the only one to use a camera to copy pictures and documents but I do think this coat hanger clip is an unusual idea. What it allows easily is the camera to be pointed directly down at what you are photographing without the tripod legs in the way. l took a quick look at “photo studio in a box” and found several useful ideas about lighting. So thanks!
Thank you for the nice post. I use my SLR for photographing pictures and documents I’m interested in trying the coat hanger clip set up. You can also purchase a special “tripod” type set up that would work for photographing documents and pictures (try googling “photo studio in a box”.
Your way is much cheaper if you already have a regular tripod!